- Panduan CameraFi Live untuk Pemula (Tutorial dalam bahasa Indonesia)
- คู่มือใช้งาน CameraFi Live สำหรับมือใหม่ (TH)
Hi, this is the CameraFi Live team.
In this basic guide for CameraFi Live beginners, we will explain how each icon works and how to use the CameraFi Live features!
Home Screen
On the home screen, you can choose between Camera / Screen mode, and in which platform to broadcast.
1. Choose between the Camera and Screen mode.
- Camera: live streaming with a smartphone or external camera equipment. Ex) Vlog
- Screen: Screen streaming of games, apps, etc. Ex) Mobile game streaming.
2. Select the broadcasting platform. Ex) YouTube, Facebook, Twitch
3. Click the START button.
Then, you will access the main screen.

Main Screen
After selecting the camera mode, the platform, and clicking START, you will be able to enter to the main screen.

Firstly, let’s start with the icons on the top:
- Profile Image: This is the profile image of your broadcasting channel
- Change Camera: Switch between front/back camera, wide-angle camera, etc.
- Mic: You can adjust the volume of the microphone and monitor the audio output, you can also set up the volume keys for zooming.
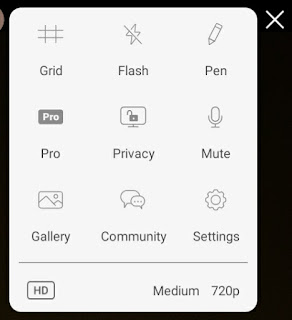
- Hamburger Menu: It has various options such as Pro, Privacy, Mute, Settings, etc.
Then, what are the icons on the bottom?
- Widget: Add streaming widgets like animated effects and web-based sources
- Effect: Apply animated graphic effects such as scoreboards, etc.
- Web: Add streaming widgets from platforms such as Streamlabs.
- Filter: Use various camera filters such as mosaic, black & white, etc.
- Multiple Shot: Create multiple scenes like if you were using several cameras only with your smartphone camera (Location has changed, refer to the link below)
https://blog.camerafi.com/2021/05/update-golf-scoreboard-scoreboard.html)
Now, let’s see where to find and how to use the modified features and the various video editing tools.

- Video: You can add the built-in camera of your smartphone, a USB external camera, video, and image files. You can use the PIP(Picture-in-Picture) feature as well.
- Audio: Select the audio sources to be used in your live stream. You can add audio and voice/recording files from your smartphone microphone (or a wired microphone / Bluetooth microphone connected to your smartphone). You may also add audio and voice/recording files from USB camera devices.
- Image: You can add your logo or image files that you want to add to your broadcast screen.
- Text: You can use subtitles, notices, or text-based memos for your broadcast.
- Effect: You can add many different creative effects with this feature.
- Web: You can add web-based sources to your live stream with this feature.
- Chat: Chat history (comments) of the broadcast can be displayed in the video.
- Preset: You can save various overlays as a preset and bring them back on screen quickly and efficiently on your next stream.
*Detailed manuals on how to use each feature are available through clicking the link on the feature's title
For any questions about CameraFi Live, please check our Tutorial page.
If the tutorial doesn’t solve your problem, please don't hesitate to leave a comment or directly contact us by email at apps.help@vaultmicro.com.
Thank you.