Hi, this is the CameraFi Live team.
From version 1.28.81.0125, the CameraFi Live team added Effects with an image included.

To apply as in the image above, the background of the image must be transparent. The right size for the image is 1200x800 (3:2).
Let's see how to remove the image background and add it to the sample PSD file by Photoshop!
If you do not how how to use Photoshop, you can use the photo editing app, PicsArt.
Please click HERE to read the tutorial.
Remove Image Background
To create a transparent background, you need to remove the existing background using Photoshop.
1. Open the image file.
2. Select the magic wand tool icon on the left menu.

3. Select the background you want to erase after pressing the Shift key. If there is any background not selected, press the Shift key and click it as well.
❗ If the selection is too wide to the unselected area, please check if the Contiguous function is activated.

4. Unlock the background image and press the Delete key to delete the selected background.
You can unlock the background by double-clicking it.

5. Complete the transparent background image.

Apply the Image
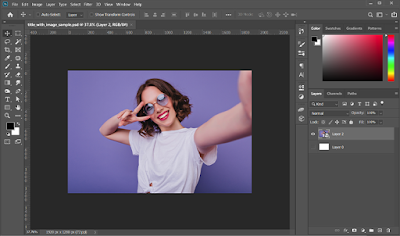
We share you the sample PSD file with the size of 1200x800(3:2)px.
⮟⮟⮟⮟⮟⮟⮟⮟

You can see sample image files a transparent background.


1. Create an image sample with the size of 1200*800 px and Transparent background.
Or, you can use the sample PSD file we provided.

2. Click the Select - All menu to select the image you'd like to open.

3. Copy and paste the image with a transparent background.

4. Resize by pressing Ctrl + T key. Then, adjust the location and press ENTER.
Try using various images!

5. Save the image with the transparent background from File - Export - Export as.

If you have any questions, please feel free to contact us in the comments below or at apps.help@vaultmicro.com.
Thank you.